HTML5 Canvas Tips

- Pixel-Art Canvas
- HI-DPI Canvas
- ClearType Font Smoothing
- Matching Background Colors on an Opaque Canvas
The <canvas> element may be the best thing to happen to HTML since <marquee>. I’ve been
using it a lot for various projects
recently and thought it’d be nice to collect some of the tips and tricks I’ve learned into once place.
Pixel-Art Canvas
If you’ve used canvas at all you know that its width="xxx" and height="xxx" attributes define the dimensions of the
image the canvas represents, while you can use the style="width: xxx; height: xxx;" CSS properties to control the
size of the element on the page. If you’re trying to create a pixelated-style game, you can use the CSS to scale up a
relatively small canvas:
<canvas id="pixelated-canvas"
		width="50" height="50"></canvas>
canvas { width: 300px; height: 300px; }
const ctx = document.getElementById('pixelated-canvas').getContext('2d');
ctx.fillStyle = 'grey';
ctx.fillRect(0, 0, 50, 50);
ctx.strokeStyle = 'black';
ctx.rect(5, 5, 40, 40);
ctx.stroke();
ctx.drawImage(document.getElementById('favicon'), 13, 13, 24, 24);
Well, isn’t that ugly! Thankfully we can fix it with the image-rendering: pixelated CSS property. Also note while
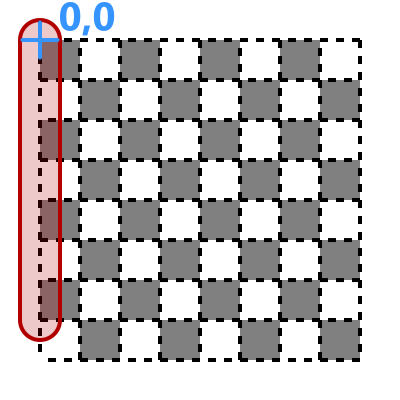
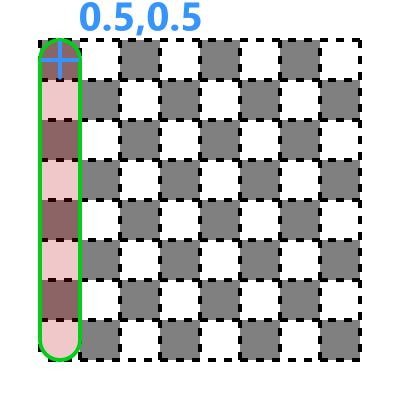
we’re here that the stroke seems to be two pixels wide, and semi-transparent. That’s because the point coordinates fall
on the borders between pixels, and the line is being drawn as if it was halfway between them. To overcome this, we’ll
need to offset the coordinates of the line by half a pixel. Maybe an illustration will help:
So, let’s apply these fixes:
canvas { width: 300px; height: 300px;
         image-rendering: pixelated; }
// ...
ctx.rect(5.5, 5.5, 40, 40);
// ...HI-DPI Canvas
Because the canvas element has a specific size in pixels, it is not DPI-aware. That is, if your operating system or browser zoom is set to anything other than 100%, the number of physical screen pixels that represent each CSS pixel may not be in a 1-to-1 ratio.
// This is the current pixel ratio of device pixels to CSS pixels. For example,
// a value of `1.5` would indicate that for every CSS pixel, there are 1.5
// device pixels (a scaling ratio of 150%).
const ratio = window.devicePixelRatio || 1;
const canvas = document.getElementById('hidpi-canvas');
const ctx = canvas.getContext('2d');
ctx.fillStyle = 'grey';
ctx.fillRect(0, 0, 200, 200);
ctx.moveTo(50.5, 105.5);
ctx.lineTo(150.5, 105.5);
ctx.strokeStyle = 'black';
ctx.stroke();
ctx.font = '20pt serif';
ctx.fillStyle = 'black';
ctx.fillText(`Ratio: ${(ratio*100).toFixed(0)}%`, 30, 100);
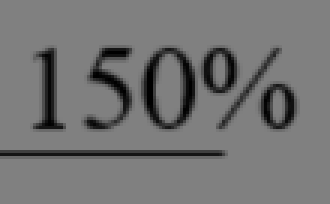
Note how the text is blurry, and the line below it is as well, despite using our half a pixel offset trick from the previous section (if your ratio is 100%, just consult the screenshot)? Let’s make some tweaks to the canvas to work around this:
// ...
const ratio = window.devicePixelRatio || 1;
const canvas = document.getElementById('hidpi-canvas');
canvas.style.width = `${canvas.width}px`;
canvas.style.height = `${canvas.height}px`;
canvas.width *= ratio;
canvas.height *= ratio;
const ctx = canvas.getContext('2d');
ctx.scale(ratio, ratio);
// ...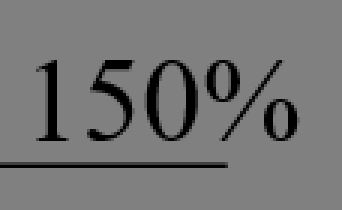
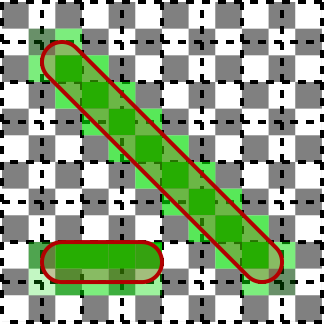
Note that in the case of my screenshots, the device scaling is 150%, which means for every CSS pixel there are 1.5 device pixels. That means that no matter how much scaling fanciness we do, our 1px line will never perfectly align to the screen’s pixel grid.
This graphic depicts a 150% scaling ratio between the device pixels (the white and gray grid) and CSS pixels (the black dotted lines). The red outlines show where a line would be drawn, aligned to the CSS pixel grid. The green pixels show the effective rasterization of the red area to the physical pixel grid.
ClearType Font Smoothing
Riding off our last example, let’s make the text rendering even smoother. If the browser knows that canvas text will
be rendered against a set color, it will use subpixel rendering (aka ClearType). To do this, we
need to use an opaque canvas, created by passing some options to the canvas’ getContext function.
const canvas = document.getElementById('cleartype-canvas');
const ctx = canvas.getContext('2d', {alpha: false});


Matching Background Colors on an Opaque Canvas
When using an opaque canvas, the default fill color when initialized or when calling ctx.clearRect(...) is always
#000. If we want the canvas fill to match our page (assuming it’s a solid color), we can get the color with this
simple function:
/**
 * Returns the background color of the nearest ancestor that is not `none`.
 * @param {HTMLElement} element
 * @returns {string}
 */
function getBgColor(element) {
    if (element === undefined) throw "Reached end of tree...";
    const bg = window.getComputedStyle(element).background;
    if (bg !== 'none') return bg;
    return getBgColor(element.parentElement);
}

// ...later...
const bg =
ctx.fillStyle = getBgColor(canvas);
ctx.fillRect(0, 0, canvas.width, canvas.height);
If the background can change (e.g., when entering or leaving dark mode) you can subscribe to change events like so:
/**
 * Returns the background color of the nearest ancestor that is not `none`.
 * @param {HTMLElement} element
 * @returns {[string, HTMLElement]}
 */
function getBgColor(element) {
    if (element === undefined) throw "Reached end of tree...";
    const bg = window.getComputedStyle(element).background;
	// Note that we've changed this to return the element as well as the color.
    if (bg !== 'none') return [bg, element];
    return getBgColor(element.parentElement);
}

// ...later...
function redraw(bg_color) {
    ctx.fillStyle = bg_color;
    ctx.fillRect(0, 0, canvas.width, canvas.height);
    // ...
}
const [bg, element] = getBgColor(canvas);
redraw(bg);
element.addEventListener('change', e => redraw(window.getComputedStyle(element).background));
Webmentions ♥️0
No webmentions were found.
Webmention support enabled by webmention.io and Webmentions for Jekyll.
-
{% for webmention in webmentions %}
-
{{ webmention.content }}
{% endfor %}
No bookmarks were found.
{% endif %}-
{% for webmention in webmentions %}
- {% endfor %}
No likes were found.
{% endif %}-
{% for webmention in webmentions %}
-
{{ webmention.content }}
{% endfor %}
No links were found.
{% endif %}-
{% for webmention in webmentions %}
- {{ webmention.title }} {% endfor %}
No posts were found.
{% endif %}-
{% for webmention in webmentions %}
-
{{ webmention.content }}
{% endfor %}
No replies were found.
{% endif %}-
{% for webmention in webmentions %}
- {% endfor %}
No reposts were found.
{% endif %}-
{% for webmention in webmentions %}
- {% endfor %}
No RSVPs were found.
{% endif %}-
{% for webmention in webmentions %}
-
{% if webmention.author %} {% endif %} {% if webmention.content %} {{ webmention.content }} {% else %} {{ webmention.title }} {% endif %}
{% endfor %}
No webmentions were found.
{% endif %}
Comments from Mastodon
You can leave a comment by replying to this Mastodon post from any ActivityPub-capable social network that can exchange replies with Mastodon.
Comment support inspired by Cassidy James (@cassidy@blaede.family) and some code borrowed from Julian Fietkau (@julian@fietkau.social).